The Dream Skirt
Let me introduce to you a project years in the making and yet completed in one day: A fabric that would only allow me to turn it into one thing and a costume event that finally made me make it. This might be qualified to be called my dream skirt. 
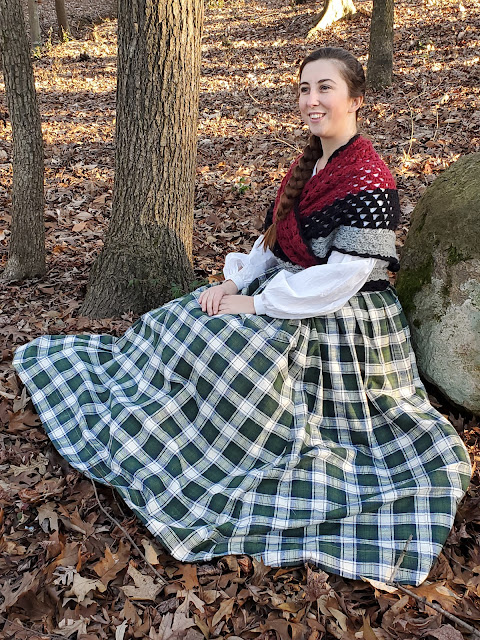
Honestly, I don't know how long this fabric has been in my stash, nor do I know where I got it (probably a thrift store). It is a tan, blue, and green plaid flannel cotton, and I have nine yards of it. There is only one thing that can be thought about with nine yards of plaid, but sadly the fabric is printed and not woven, and so my lady kilt (AKA Arasaid) will have to wait. The fabric still screamed skirt, and not just a little skirt either: a large, floor-length, flowing, as many yards as I can fit, skirt. One of the things I loved about mid-19th century reenacting was the huge, flowing, floor-length skirts. Even if they were plain or simple, I felt like a princess. Yet simple they are. Styled right, a skirt like that could be used for so many things. This time I used it for a Celtic-inspired outfit to match my partner at a Renaissance evening at a local brewery. It can also be styled for some Little House on the Prairie shenanigans, and if I can't find a way to wear it to work, clearly I'm failing. Now, here I am getting ahead of myself.


Honestly, I don't know how long this fabric has been in my stash, nor do I know where I got it (probably a thrift store). It is a tan, blue, and green plaid flannel cotton, and I have nine yards of it. There is only one thing that can be thought about with nine yards of plaid, but sadly the fabric is printed and not woven, and so my lady kilt (AKA Arasaid) will have to wait. The fabric still screamed skirt, and not just a little skirt either: a large, floor-length, flowing, as many yards as I can fit, skirt. One of the things I loved about mid-19th century reenacting was the huge, flowing, floor-length skirts. Even if they were plain or simple, I felt like a princess. Yet simple they are. Styled right, a skirt like that could be used for so many things. This time I used it for a Celtic-inspired outfit to match my partner at a Renaissance evening at a local brewery. It can also be styled for some Little House on the Prairie shenanigans, and if I can't find a way to wear it to work, clearly I'm failing. Now, here I am getting ahead of myself.
While this is not fully a tutorial, I do want to walk through my process of making this skirt.
As I always do, I took on the challenge of making this skirt in one day due to some back-to-back events that I had. By back-to-back I mean that Monday I was prepping for a Twelfth Night party I was hosting at my house for the Charlotte Costume Club on Tuesday, and Wednesday I had to finish an English gown that was 90% completed (pictures of that coming soon) for a living history on Saturday. It was also Wednesday that I decided I wanted to sew this entire skirt on Thursday for the Renaissance Cabaret on Friday. Do I need to spell that out again?
As I always do, I took on the challenge of making this skirt in one day due to some back-to-back events that I had. By back-to-back I mean that Monday I was prepping for a Twelfth Night party I was hosting at my house for the Charlotte Costume Club on Tuesday, and Wednesday I had to finish an English gown that was 90% completed (pictures of that coming soon) for a living history on Saturday. It was also Wednesday that I decided I wanted to sew this entire skirt on Thursday for the Renaissance Cabaret on Friday. Do I need to spell that out again?

I got the English gown finished on time and packed up my supplies before I went off to work. The plan was to head to the Charlotte MakerSpace as soon as I got out of work. This space has become my Project Runway Workroom because I always go there to complete design projects quickly. I imagine Tim Gunn telling me to make it work when I start to panic about time.


 After the side seams were done, it was time to start pleating. I do not take on pleating projects without the math from Snappy Dragon's YouTube video. This is perfect for knife pleats for 18th century garments and saved my butt with that previously mentioned English gown and this skirt. To be honest these are the only two projects that I have pleated like this and I am definitely still learning. I had to redo half the pleats because I started in the wrong place. I went with a large 1.5 inch visible please which came out beautifully. Attaching the waistband was super simple once the pleats were done. In my hurry to get the skirt done, I definitely made the waistband too big. Next I put the skirt back on the mannequin and measured out the length from my waist to the floor. Which I still left just barely too long. You would think that the pleats would be my least favorite part of this project, but I hate hemming more. The four to five yards of hemline is just incredibly daunting. I started with marking an inch up from the bottom and ironed that the entire way around. Then I measured that up another six inches (probably could have trimmed it) and ironed that down. Sewing this was when I finally realized the stich settings on the machine were set incorrectly but at that point I was almost finished with the hem and there was NO WAY I was seam ripping that.


As I said, the project was fairly simple, minus the amount of yardage. I had a few patterns that I was debating between using already in my stash, Option one was the skirt from the Simplicity 1818 pattern. This is based on an 1860s day gown. Option two was the Simplicity 3809 Renaissance skirt. An honorable mention would be the Simplicity 8411 American Duchess pattern. (Clearly I have a lot of Simplicity patterns, but can you argue with the $0.99 sale at Joann's?) In the end, the Renaissance skirt won out, but not because I was going to a Renaissance event. I chose that because of the time, and I had already made the skirt once and cut out the pattern pieces. Having that step already done saved me a lot of time. I also had a better idea of how to adjust the pattern to make the skirt that was in my head. 

The pattern originally called for three panels, which makes a much more A-line skirt. I went straight for four panels and was happy with it when it went up on the mannequin. Stitching up the side panels took very little time with a machine. This honestly was a nice change since I have been doing a lot of hand sewing. Funny enough... and I didn't realize this until the end of the night... the sewing machine was set to one of the fancy stitches and not the straight stitch that I always use. It's not noticeable and seems to be holding just fine. I left open the last side seam about 6 inches from the top to help with getting in and out of it.

 After the side seams were done, it was time to start pleating. I do not take on pleating projects without the math from Snappy Dragon's YouTube video. This is perfect for knife pleats for 18th century garments and saved my butt with that previously mentioned English gown and this skirt. To be honest these are the only two projects that I have pleated like this and I am definitely still learning. I had to redo half the pleats because I started in the wrong place. I went with a large 1.5 inch visible please which came out beautifully. Attaching the waistband was super simple once the pleats were done. In my hurry to get the skirt done, I definitely made the waistband too big. Next I put the skirt back on the mannequin and measured out the length from my waist to the floor. Which I still left just barely too long. You would think that the pleats would be my least favorite part of this project, but I hate hemming more. The four to five yards of hemline is just incredibly daunting. I started with marking an inch up from the bottom and ironed that the entire way around. Then I measured that up another six inches (probably could have trimmed it) and ironed that down. Sewing this was when I finally realized the stich settings on the machine were set incorrectly but at that point I was almost finished with the hem and there was NO WAY I was seam ripping that.
The next part of this is now one of my favorite story. I was probably staring at the waistband for a few minutes debating if I was going to use the machine to top stitch the waistband or if I was going to hand sew it. The decision was made for me when I saw the lights in the main area of the MakerSpace go out. The rule is last person out has to lock up and I do NOT like to be last person. I threw all my stuff and the skirt in the bad soo quickly and was out the door. The next day (Friday, if you look at the calendar) there was a meeting at work. I brought the skirt in with me and for the hour long meeting I sewed the inside of the waistband. You will quickly learn, that is my favorite thing to do. At one point I tried on the skirt over my work clothes, I was taking is back off again right as my boss walked by. He actually thought I was stripping in the office, to which I said that he should have known better. I got the skirt finished that day.
And now for the reveal...


Comments
Post a Comment